Are you curious about how to get involved in exciting new projects using Bybit’s Web3 IDO 2.0? Don’t worry! This guide will explain everything in a fun and easy way. We’ll break it down step by step, so you can understand how to participate in one of the top IDOs this month! The good thing about Bybit Web3 IDO 2.0 is that you don’t have to complete the KYC to participate in the IDO token sales.
What is Bybit Web3 IDO 2.0?
Before we dive in, let’s clarify what Bybit Web3 IDO 2.0 is. An IDO (Initial DEX Offering) is like a launch party for a new digital project. It’s where people can buy tokens (like digital coins) for the first time. Bybit is a popular platform where you can join these IDOs and support cool new ideas in the blockchain world!
Step 1: Create a Bybit Account to join Bybit Web3 IDO
To get started, you’ll need to have an account on Bybit. Here’s how:
- Visit Bybit’s Website: Go to Bybit.com.
- Sign Up: Click on the “Sign Up” button. You’ll need to fill in some information, like your email and a password. Make sure your password is strong and unique!
- Verify Your Email: Check your email for a verification link from Bybit. Click on it to confirm your account.
Example: Think of signing up like creating a new club. You need to fill out a form and show you really want to join!
Step 2: No need for KYC Verification
To participate in the IDO, you don’t have to complete KYC (Know Your Customer) until you want to withdraw your funds to your bank account or vice-versa. If you want to buy it through your bank account you have to complete the KYC from the below steps.
- Go to KYC Section: In your account settings, find the KYC verification option.
- Submit Your Documents: You’ll need to provide some personal information and upload a photo ID (like a passport or driver’s license).
- Wait for Approval: This might take a little time. Once approved, you’re all set!
Example: It’s like getting a library card—you need to show who you are before borrowing books.
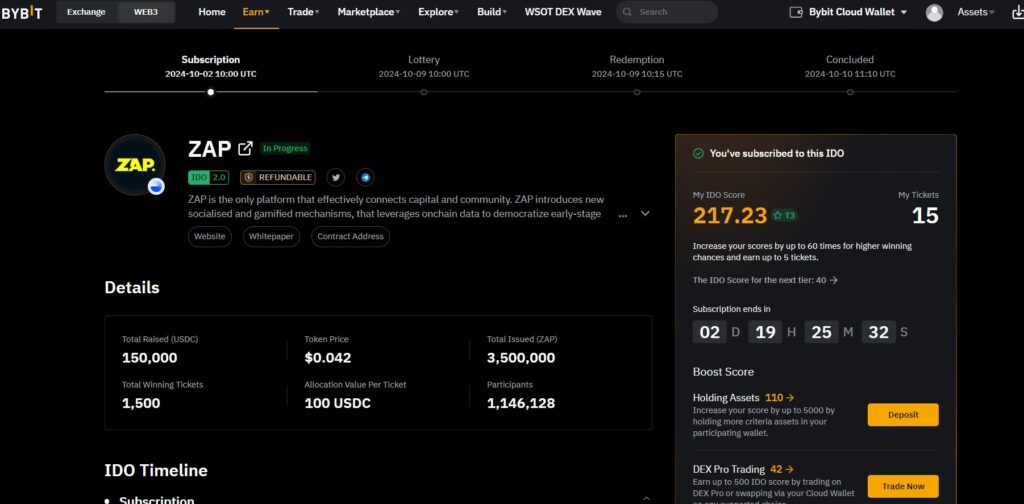
Step 3: Subscribe the Bybit Web3 IDO 2.0
Next, on the day of subscription of new IDOs you have to Subscribe to the specific IDO –
- Get Bybit Web3 IDO 2.0 Lottery Tickets: Once subscribed you will get Lottery tickets as per your IDO score. You can increase the IDO score from these ways mentioned in this article.
| Bybit IDO Tier | Bybit IDO Score Range | Ticket Allocations | Maximum Number of Wins |
| 0 | 0 – 29 | 1 | 1 |
| 1 | 30 – 99 | 3 | 1 |
| 2 | 100 – 199 | 8 | 1 |
| 3 | 200 – 499 | 15 | 2 |
| 4 | 500 – 999 | 30 | 3 |
| 5 | ≥ 1,000 | 60 | 5 |
Step 4: Redeem your Bybit Web3 IDO Allocation
On the Redemption day, lottery winners will be announced and they will asked to redeem their lottery allotted IDO allocations. The user must have to buy the full amount of what is allotted.
Step 5: Trade or Hold Your Tokens
Once the IDO is finished on concluded day, you can either trade your tokens for other cryptocurrencies or hold onto them for future use.
- Go to Your Wallet: Check your assets to see the new tokens.
- Decide What to Do: You can keep them, trade them, or even use them in games or apps!
Conclusion
Now you know how to participate in Bybit Web3 IDO 2.0! Remember, it’s all about creating fun and new opportunities in the digital world. With a little patience and excitement, you can be part of one of the top IDOs this month! Make sure to increase your Bybit IDO score as much as possible through the ways mentioned in this article to get most number of tickets.
Happy investing!